Understanding the Basics of Wine Rack Design
Key Elements in Wine Rack Crafting
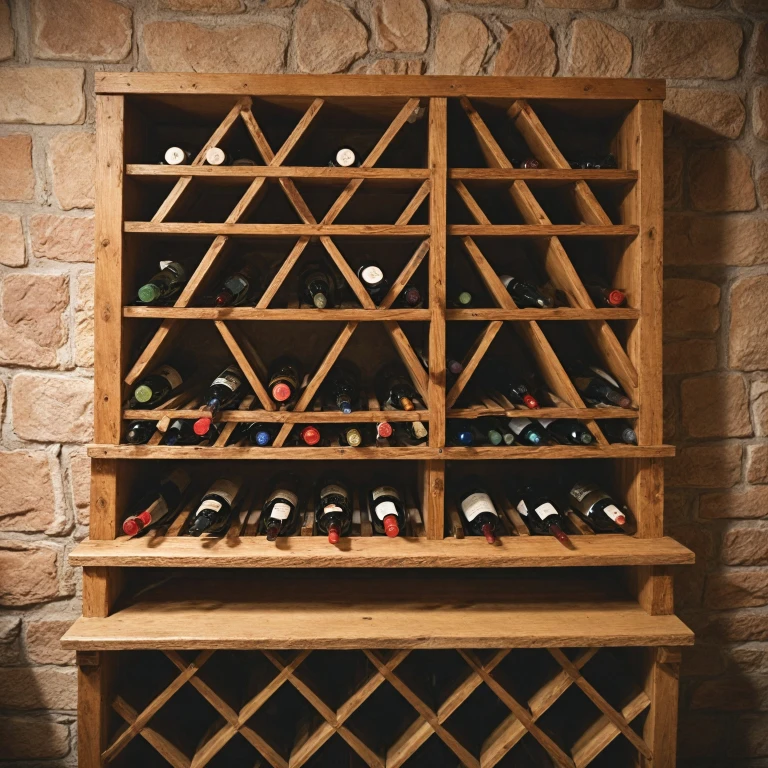
When crafting the perfect wine rack, understanding the fundamental aspects of wine rack design is crucial. The design of a wine rack not only affects its aesthetic appeal but also its functionality and how well it can accommodate your wine collection.
- Capacity Needs: Before diving into any wine rack diy projects, assess how many wine bottles you plan to store. Will you need a simple wine shelf for a countertop wine display or something larger that holds dozens of bottles?
- Available Space: Measure and mark the dimensions of the space where you intend to build your rack. This step will guide your decision on the size and shape of your rack plans, ensuring it fits perfectly in your desired location.
- Design Considerations: Consider whether you want a classic layout that keeps the neck of the wine bottles elevated or a more modern design that showcases the bottles wine label. This decision will influence your choice of rack plan and how you cut your boards.
- Structural Integrity: When you embark on a diy wine rack adventure, it's imperative to ensure that the structure is robust enough to support the weight of multiple bottles. Investing time in understanding how to properly drill holes and install pocket holes is essential for a stable design.
By focusing on these elements, you lay a solid foundation for your project, paving the way for the subsequent steps where you will choose the right materials and incorporate style and functionality into your diy projects.
For more insights on how to elevate your wine experience, continue exploring our resources. Stay tuned as we delve into more intricate aspects in the following sections.
Choosing the Right Materials for Your Wine Rack
Selecting the Ideal Components for Your Wine Rack
Choosing the right materials for your wine rack is a vital step in ensuring the durability and style of your diy wine project. The choice of materials will greatly influence not only the appearance but also the functionality of your wine rack. First, consider the type of wood you want to use. Hardwoods like oak, maple, or walnut are popular choices and offer greater strength to hold bottles securely. Softwoods, while often easier to cut and drill, may require extra care to sustain the weight of wine bottles over time. When planning your wine rack plans or diy projects, it’s crucial to determine the number of bottles the rack is expected to hold. This helps guide the dimensions and the amount of material you will need. Measure and mark your boards accurately before you cut them, ensuring each shelf will correctly fit in its designated space. Step cut and drill holes for shelving with precision to prevent instability. Whether you're building a simple wine rack for your countertop wine display or a full-floor installation, creating a stable structure is key. Carefully plan the placement of the top and bottom boards as well as the reinforcements using pocket holes to maximize the structural integrity. Consider how finishes like paint or stain can enhance the wood’s natural beauty and complement your space's existing decor. This diy step not only adds aesthetic appeal but also provides a protective layer against wear and tear. For those new to building, working with free DIY or rack plans available online can provide an excellent starting point. These can be easily modified to better fit your specific needs and preferences. Finally, for more ideas about materials and how to incorporate them, check out this article on enhancing your wine experience with a wooden wine bottle holder.Customizing Wine Rack Plans to Fit Your Space
Adapting Your Design for Available Space
When creating your own wine rack, making the most of the available space is key. Start by assessing where you want to place your diy wine project. For instance, if you have a countertop wine area, you might want a compact size that holds bottles efficiently without taking too much space. Carefully measure and mark the dimensions of your designated space before starting your rack plans.
Maximizing Utility Without Compromising Style
Design isn’t just about aesthetics; your wine rack must also be functional. Consider how many bottles of wine you plan to store. Calculate the number of shelves needed based on your space and the dimensions of your shelves and boards. A simple wine rack might have a top bottom shelf design, offering a versatile option for any space.
Optimizing Layout for Wine Accessibility
Once the basic layout is decided, think about how the wine bottles will sit on each shelf. You can vary the wine rack by including a mix of vertical and horizontal bottle arrangements. This will not only be stylish but will allow easy access to any bottle. Don't forget to incorporate space to drill holes with your drill for secure placement of the boards.
Customization Is Key
Give your project a personal touch by customizing the finish. Decide whether you will cut boards to a rustic finish or prefer a sleek, modern look. Use a wood stain to match your existing home decor, bringing an additional layer of elegance. Moreover, ensure you drill pocket holes to hold the construction seamlessly together, adding strength for long-term stability.
These steps will help create a design that complements your home, making your wine rack both a statement piece and a practical addition. As you build, remember to follow the step-by-step process to achieve that perfect balance of style and functionality in your diy projects. And don't forget, if you're curious about choosing the perfect glass for specific wines, visit our guide on understanding the ideal glass for Sauternes.
Incorporating Style and Functionality
Balancing Aesthetics with Functionality in Wine Rack Design
Designing your wine rack is more than just about storing bottles; it's about creating a piece that blends seamlessly into your existing space while offering practical use. Here are some considerations as you embark on this diy wine rack project:
- Function First: Before getting lost in aesthetics, focus on how the wine rack will function. Will it be a countertop wine rack holding only a few bottles or a larger piece as a focal point? Consider how many wine bottles you intend to store and ensure the rack plans cater to that need.
- Space Optimization: Fit your wine rack into your space efficiently without crowding. Measure and mark your available area and envision where the rack will be in relation to other furnishings. This ensures easy access to bottles and the ability to showcase your collection.
- Material Matters: The choice of materials contributes significantly to the style. For a rustic feel, you might opt for reclaimed wood, whereas a modern look could be achieved with metal accents. When working with wood, ensure it's treated properly to prevent stains and maintain its look over time.
- Accent and Details: As you build, consider incorporating features like shelves or incorporating pocket holes for a sleek finish. Give attention to the top and bottom shelves, ensuring they're sturdy enough to hold bottles securely.
- Color and Stain: Once the structure is complete, choose a stain or finish that complements your decor. A light stain could highlight the wood's natural grain, while a darker one might add an element of sophistication.
Ultimately, a carefully planned wine rack does more than just store wine — it enhances your space, reflecting your style while preserving the functionality required for accessing your favorite bottles. Consider this balance as you progress to the steps of building your rack, such as how to measure, mark, cut, and drill pocket holes.
Step-by-Step Guide to Building Your Wine Rack
Gathering Your Tools and Materials
Before diving into the construction of your wine rack, ensure you have all the necessary tools and materials at hand. This includes wood boards, a drill, screws, a saw for cutting, a measuring tape, and wood stain for finishing. Having a clear rack plan is essential to guide you through each step of the process.
Preparing and Cutting the Wood
Begin by measuring and marking your wood boards according to your wine rack plans. Precision is key, so double-check your measurements before making any cuts. Use a saw to cut the boards to the desired length for the shelves and sides. This step is crucial to ensure that your wine bottles will fit snugly on the shelves.
Assembling the Frame
With your boards cut, it's time to start assembling the frame of your wine rack. Use a drill to create pocket holes, which will allow for a more secure and seamless connection between the boards. Assemble the top, bottom, and sides of the rack, ensuring everything is square and level.
Creating the Shelves
Next, focus on the shelves that will hold the bottles. Drill holes into the shelves to accommodate the necks of the wine bottles, ensuring they are evenly spaced. This step will help in maintaining the stability of the bottles when placed on the rack.
Final Assembly and Finishing Touches
Once the shelves are prepared, attach them to the frame using screws and a drill. Make sure everything is securely fastened. After assembly, apply a wood stain to enhance the appearance of your wine rack and protect it from wear and tear. Allow the stain to dry completely before placing any bottles.
Testing and Adjustments
Finally, place your wine bottles on the rack to ensure everything fits as planned. Make any necessary adjustments to accommodate different bottle sizes. This step is important to confirm that your diy project not only looks great but also functions perfectly.
Maintenance and Care for Your Wine Rack
Keeping Your DIY Wine Rack in Top Shape
Once your DIY wine rack project is complete, ongoing maintenance is vital to ensure its longevity and functionality. Whether you've chosen a countertop wine rack or wall-mounted design, regular upkeep will help preserve the wood's integrity and appearance.- Regularly Clean and Dust: Wine racks, especially those constructed with wood, can quickly accumulate dust. Regular cleaning not only keeps your rack looking tidy but also helps preserve the wood. Gently dust the shelves and front areas where wine bottles rest.
- Inspect for Any Damage: Routinely check your wine rack for signs of wear and tear. Look for any loose boards or screws. Pay particular attention to the pockets where constructs like pocket holes and drill holes are used. Tighten fittings as necessary.
- Re-Stain When Needed: Over time, wood can lose its luster. Applying a fresh coat of stain can revitalize your wine rack, restoring its original finish. This should be done every few years to maintain the wood's appearance and protect it from moisture or UV damage.
- Monitor for Structural Integrity: If your rack is frequently loaded with wine bottles, ensuring it can hold bottles securely is crucial. Evaluate the structure routinely, checking the top and bottom shelf stability and the integrity of any pocket hole joints. This will prevent any unfortunate accidents.
- Adjust and Refit: As seasons and humidity levels change, boards can shift. Adjust and reinforce connections, such as those made with step drill holes, to keep your wine rack stable and ensure it aligns with your original design plans.
