Why condenser coil cleaning matters more than any other task
Most first time owners assume a wine cooler is a plug and forget appliance. When the condenser coils quietly clog with dust, the compressor can end up running significantly longer just to keep your wine at the same temperature. That extra strain slowly cooks the compressor and turns a promising wine storage plan into an expensive repair.
Inside any compressor based wine cooler or wine fridge, the condenser coil is the hot side of the cooling system. Refrigerant leaves the compressor, runs through the condenser coils, and dumps heat into the room air so the unit can chill your bottles. When dust mats over each coil, the cooler cannot shed heat efficiently and the internal temperature of the wine refrigerator may drift several degrees above the thermostat setting before alarms or warm bottles alert you.
For a small wine cellar cabinet or compact wine refrigerators under a counter, that temperature creep is brutal on delicate white wine and sparkling wine. A neglected refrigerator condenser also means the fan cycles more often, noise increases, and the wine cooler feels warm to the touch around the base grille or rear panel. Regular coil cleaning is the single best maintenance habit to protect both your best wine and the clean wine you plan to age for a few quiet years.

Finding the coils on your wine cooler and accessing them safely
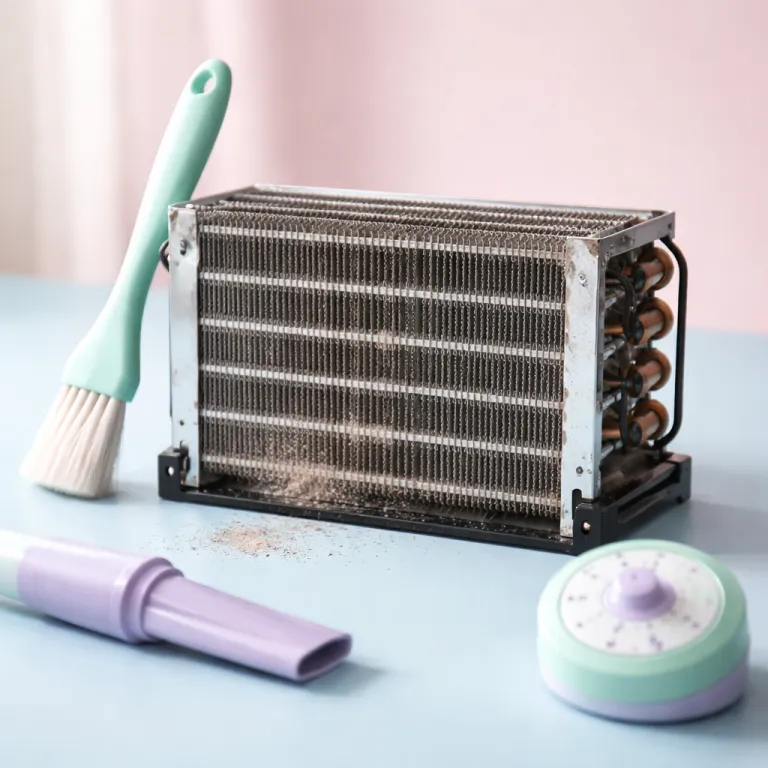
Before any cleaning, you need to know where the condenser coils actually sit on your specific wine cooler. On many freestanding wine coolers and compact wine refrigerators, the condenser coil is mounted on the back of the unit as a black metal grid or a boxed panel with ventilation slots. Built in wine refrigerators and some slim wine fridge models hide the refrigerator coils behind a base grille at the front, pulling air in low and exhausting it out the back or sides.
Safety first: always unplug the cooler or fridge from the wall before you touch any coil or fan, and avoid poking tools near wiring, control boards, or refrigerant lines. Slide the appliance gently away from the wall, keeping bottles inside only if the move is short and the floor is smooth, then locate the base grille or rear cover. If your wine storage cabinet has a removable grille, pop it off to expose the refrigerator condenser and the fan that pushes air across the coils.
Some premium wine cellar units use a sealed metal box around the condenser coils, held by a few screws that you can remove with a basic screwdriver. Others leave the coil fully exposed, which makes coil cleaning easier but also lets dust accumulate faster in kitchens or near pets. If you are unsure which panel hides the condenser, check the manual diagram, then read a practical guide such as this one on creative ways to handle wine gear and accessories to build general confidence with basic wine appliances.
Safety callout: handling electrical parts and refrigerant
- Always disconnect power before removing any grille, cover, or panel.
- Wear light gloves and safety glasses if you will reach near sharp metal or fan blades.
- Do not bend or pierce copper tubes or aluminum fins; they carry refrigerant under pressure.
- Avoid metal tools around exposed wiring, terminals, or control boards.
- If you see damaged insulation, sparks, or oily residue on lines, stop and call a technician.

Step by step: a 20 minute routine for clean condenser coils
Once the unit is unplugged and the coils are visible, the actual cleaning is simple and methodical. Start with a soft brush attachment on your vacuum cleaner and gently run it along the length of each condenser coil, letting the suction pull away dust rather than forcing the brush into the fins. Work slowly from top to bottom so loosened dust falls into areas you have not yet cleaned, then repeat until the coils look more like bare metal than a grey sweater.
For tight spaces in a wine refrigerator base grille, a narrow coil brush designed for refrigerator coils helps you reach behind the fan and between closely spaced coils. Use the coil brush to dislodge stubborn dust, then follow again with the vacuum to remove debris before it migrates back into the cooling path. If you see sticky residue on the condenser coils, lightly dampen a cloth with clean water, wring it almost dry, and wipe the accessible surfaces without flooding any electrical parts.
Take a moment to inspect the fan blades, wiring, and the frame of the wine cooler for signs of overheating, such as discoloration or a burnt smell. This is also the right step to check the door gasket, because a leaky seal forces the refrigerator condenser to work harder and undermines even the best coil cleaning routine. For a broader seasonal routine that pairs clean coils with gasket care and interior cleaning, a guide like the 20 minute cellar reset maintenance checklist shows how professionals structure quick but effective wine storage upkeep.
Quick 6 step condenser coil cleaning checklist
1) Unplug the wine cooler and pull it away from the wall (about 2 minutes). 2) Remove the front base grille or rear cover to expose the refrigerator coils (2 to 3 minutes). 3) Vacuum dust with a soft bristle brush from top to bottom (5 minutes). 4) Use a narrow coil brush to loosen debris between fins and around the fan (5 minutes). 5) Wipe accessible surfaces with a barely damp cloth, avoiding electrical parts (3 minutes). 6) Reinstall panels, push the wine fridge back into place, and plug it in (2 minutes).

How often to clean, and what your door gasket and filters need
In a low dust apartment with no pets, condenser coil cleaning twice per year is usually enough to keep a wine cooler efficient. Place the same unit in a busy kitchen, near a window, or in a garage, and those coils can load with dust in a few months, which means quarterly cleaning is a safer rhythm. If you see a visible grey mat on the coil or feel hot air blasting from the base grille, you have already waited too long between cleanings.
Door gaskets deserve the same attention because a cracked or dirty seal lets warm air leak into the wine fridge and forces the compressor to run harder. Wipe the gasket with a cloth dampened in mild soapy water, rinse with clean water, then dry thoroughly so the rubber does not stick to the cabinet. Inspect the corners for splits, and if you notice flattening or brittleness, plan a replacement before it compromises your best wine or any clean wine you are holding for guests.
Many wine refrigerators and wine coolers also include a small carbon filter that keeps the air inside the wine storage cavity fresh. Replace that filter according to the manual, usually every 6 to 12 months, because a clogged filter can restrict airflow and subtly stress the cooling system. Pairing filter changes with coil cleaning and a quick check of the refrigerator coils gives you a simple maintenance calendar that protects both the appliance and the bottles it guards.
Warning signs, real failure risks, and when to call a professional
Several early warning signs tell you that your condenser coils need attention long before the compressor fails. If the wine cooler runs almost constantly, the sides of the refrigerator feel unusually warm, or the internal temperature of the wine cellar cabinet drifts several degrees above the set point, suspect a dirty condenser coil first. A sudden increase in fan noise near the base grille or rear panel is another clue that dust is choking airflow around the refrigerator condenser.
When you ignore those signals, the compressor in the unit runs hotter, the lubricating oil breaks down faster, and a once simple cleaning condenser task turns into a full system replacement. Professional servicing for a compact wine refrigerator or small wine fridge typically costs far more than a vacuum, a coil brush, and 20 minutes of your time. For first time owners choosing between models, guides on topics such as how a single zone wine refrigerator supports everyday wine enjoyment can help you pick a design with easy coil access, which makes long term maintenance less of a chore.
If you notice burnt smells, visible oil leaks around the condenser coils, or repeated tripping of the circuit breaker, stop and call a qualified technician rather than trying to clean condenser components yourself. Those symptoms point to electrical or refrigerant issues that simple coil cleaning will not fix and that can be dangerous to tackle without training. For everything else, a regular routine of vacuum cleaning, gentle brushing, and a quick wipe with water keeps the appliance efficient, the coils clean, and your wine storage stable for years.
Essential tools for safe wine cooler condenser coil cleaning
Keep a soft bristle vacuum brush, a narrow refrigerator coil brush about half an inch in diameter, a flathead screwdriver for grille panels, and a clean microfiber cloth in your wine fridge maintenance kit. These simple tools let you clean condenser coils thoroughly while avoiding damage to fins, wiring, and sensitive components.
FAQ
How often should I perform condenser coil cleaning on my wine cooler ?
Most wine coolers benefit from condenser coil cleaning at least twice per year in relatively clean homes. If your appliance sits in a kitchen, near pets, or in a dusty garage, plan to clean the condenser coils every three to four months. A quick visual check of the coil and base grille each season helps you adjust the schedule to your real environment.
Can I clean the condenser coil without emptying my wine fridge ?
You can usually clean the condenser coil on a wine fridge without removing every bottle, as long as you move the unit gently and keep it level. Always unplug the refrigerator before cleaning, and avoid banging or tilting it sharply while you access the coils. If you expect a long maintenance session, consider moving your best wine to a temporary cool, dark spot to protect it.
What tools do I need to clean coils on a wine refrigerator safely ?
The basic tools for safe coil cleaning are a vacuum cleaner with a soft brush attachment, a narrow coil brush for tight spaces, and a slightly damp cloth with clean water. These let you remove dust from the condenser coils and surrounding areas without bending fins or damaging wiring. Avoid harsh chemicals or high pressure water, which can harm both the unit and its cooling performance.
How do I know if dirty refrigerator coils are causing temperature problems ?
If your wine storage temperature drifts several degrees above the thermostat setting, or the wine cooler runs almost constantly, dirty refrigerator coils are a likely cause. Feel around the base grille or rear panel ; if it is hotter than usual, the condenser is probably struggling to shed heat. Cleaning the coils and checking the door gasket often restores normal cooling without further repair.
When should I call a professional instead of doing coil cleaning myself ?
Call a professional if you see oil around the condenser coil, smell burning, or hear loud grinding from the compressor area. Those signs suggest mechanical or electrical failures that go beyond simple cleaning and can be unsafe for a first time owner to address. Routine dust removal, gasket cleaning, and basic maintenance are ideal DIY tasks, but refrigerant or wiring issues belong with a qualified technician.