Why a built-in wine cooler lives or dies by front ventilation
A built-in wine cooler looks seamless in a custom kitchen, yet its survival depends on how efficiently it can breathe through the front grille. When a cabinet maker treats a built-in wine refrigerator like a standard fridge and boxes in the sides and rear, heat from the compressor and condenser has nowhere to go and the unit quietly cooks itself over time. That is why every serious wine cellar designer treats ventilation math as carefully as bottle counts or lighting plans.
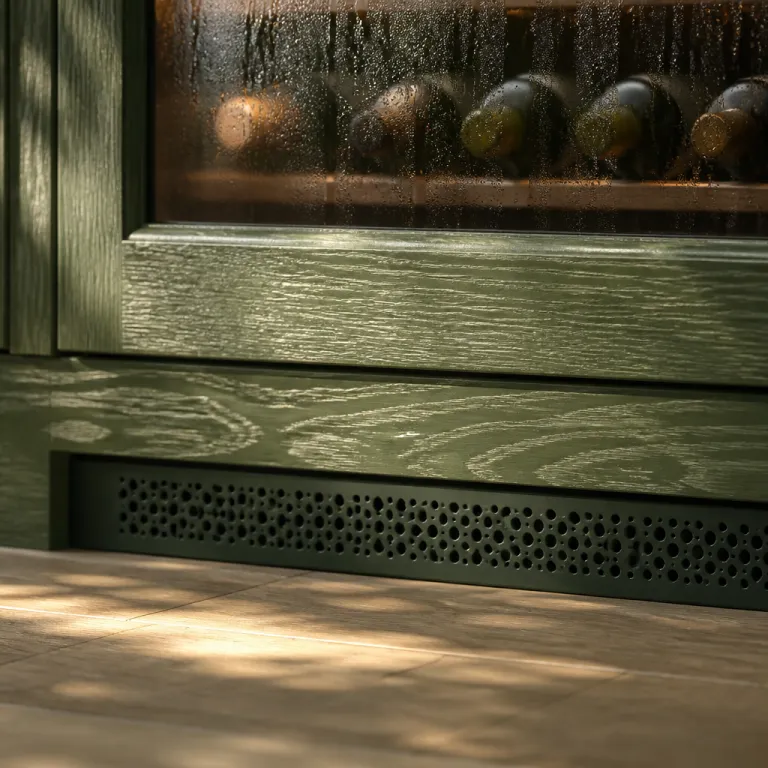
Front venting is the defining feature that separates a true built-in wine cooler from a cheaper rear-venting bar fridge. A rear-venting wine refrigerator relies on open air behind the unit, so when it is pushed into a tight cabinet the hot exhaust air recirculates and raises the internal temperature of the cooler and the surrounding cabinetry. In contrast, a front-venting wine fridge pulls air in through a toe-kick grille, pushes it across the condenser, and exhausts it forward into the room, which keeps the cabinet cavity closer to ambient kitchen temperature even when the compressor runs hard in summer.
Manufacturers such as Allavino, U‑Line and Bosch design their built-in wine units with carefully modeled airflow paths, but those assumptions collapse when an installer blocks the grille with a decorative panel or a thick rug. A 60 centimetre wide dual-zone wine cooler from a premium series might be engineered for a 35 to 40 percent compressor duty cycle at 25 °C ambient, yet a poorly vented cabinet can push that duty cycle above 70 percent when the kitchen hits 30 °C. That extra runtime shortens compressor life, increases noise at the bar or island, and undermines the precise zone wine temperature stability that collectors expect from a dedicated wine fridge.
Front venting vs rear venting in real kitchens
In a freestanding position, a rear-venting cooler can be a good value choice at a lower price unit, especially when you only need a small 20 bottle capacity. Once you slide that same refrigerator into a tight island cutout, the regular price savings vanish as the compressor strains, the cabinet warms, and the wine ages faster than intended. A front-venting built-in wine cooler costs more at first, but the sale price difference often looks modest compared with the cost of replacing overheated stock or repairing swollen veneer around the cutout.
Dual-zone built-in wine units complicate the airflow story because they stack two evaporators or a partitioned air channel behind a single front grille. The lower zone stainless steel lined compartment often runs cooler for sparkling wine, while the upper zone wine chamber holds reds at 12 to 14 °C, and both depend on stable condenser temperatures to maintain their set points. When hot exhaust air is trapped behind a decorative plinth, the controller compensates by running the compressor longer, which makes the temperature swing wider in each zone and can defeat the purpose of paying for a dual-zone wine cooler in the first place.
Brands that publish detailed airflow diagrams, such as Allavino with its FlexCount and FlexCount Tru Vino series, are worth prioritizing if you are planning a serious wine cellar wall. Their VSWR built-in models use front-venting stainless steel grilles that sit flush with standard 60 centimetre deep cabinetry, and the manufacturer specifies minimum toe-kick openings to keep the condenser supplied with cool air. When you compare a VSWR stainless steel unit with a similar capacity black cabinet bar fridge, the difference in long-term performance under a stone countertop in August is not subtle, especially once you factor in the real unit price of premature compressor failure.
Cabinet cutout math: depth, width and the unforgiving millimetres
Cabinet cutout dimensions for a built-in wine cooler look simple on paper, yet the tolerances are tight enough that a few millimetres can decide whether your install runs cool or bakes. Most manufacturers call for 0.6 to 1.3 centimetres (about 0.25 to 0.5 inch) of clearance on each side and at the top. That slim air gap is not about giving you wiggle room during installation; it is the only pathway for warm air to rise and escape from the cavity around the refrigerator shell.
Depth is where many wine cellar builders get caught, especially when they are matching a built-in wine refrigerator to deep stone countertops. A typical 60 centimetre base cabinet has an internal depth of around 56 centimetres, while a serious dual-zone wine cooler with a 40 to 50 bottle capacity often measures 58 to 60 centimetres deep including the door and hinge. If you do not allow a few extra centimetres behind the unit for the power cord and any rear protrusions, you end up pushing the cooler hard against the back wall, crushing the cord, and blocking what little rear convection the design expects.
Width tolerances matter just as much, particularly with stainless steel trimmed doors that need a clean reveal against painted gables. If your cabinet maker builds the opening to the exact nominal width of the cooler, seasonal wood movement can pinch the sides of the unit and transmit vibration into the joinery, which is the opposite of what you want in a quiet bar area. Leaving a consistent 3 to 5 millimetre gap on each side, then finishing the edges with a slim black shadow line, gives the wine fridge room to breathe while still looking integrated with the rest of the series cabinetry.
Planning for future models and real bottle counts
One subtle trap is designing a cutout around the marketing capacity of a single model instead of the real bottle geometry of your collection. A 60 centimetre wide FlexCount Tru Vino unit might claim a 56 vino bottle capacity using tightly packed Bordeaux shapes, yet your mix of Champagne, Burgundy and irregular bottles will reduce that number significantly. If you later decide to upgrade to a larger FlexCount series cooler with a slightly taller chassis, a cutout built to the bare minimum height can block the front-venting grille and choke the airflow just when you add more heat load.
For a homeowner planning a long-term wine cellar wall, it is smarter to size the opening for the largest realistic built-in wine cooler you might ever install, then use a filler panel above or beside the current unit. That way, when a new VSWR stainless steel model or a more advanced dual-zone wine refrigerator comes on sale at an attractive sale price, you can swap units without calling the cabinet maker back. The regular price of a small filler panel is trivial compared with the cost and disruption of modifying stone, tile and electrical once the kitchen is finished.
When you are comparing models, pay attention to the published cutout diagrams rather than just the overall dimensions on the spec sheet. Some brands require extra height at the front for a taller hinge wine mechanism, while others need a deeper recess to accommodate a rear mounted water tray or compressor hump. If you want a curated list of top built-in wine coolers with clear dimensional drawings, a dedicated buying guide such as the one at top built in wine coolers can save hours of cross checking and help you avoid a costly misfit between cabinet and cooler.
Toe-kick grilles, airflow paths and the mistakes that cook compressors
The toe-kick grille on a built-in wine cooler is not a decorative afterthought; it is the primary airway that keeps the condenser from overheating. Air enters through the lower portion of the grille, passes across the condenser coils, and exits either through the upper slots or a hidden channel at the front of the unit. When that path is blocked by a thick rug, a custom panel or a misaligned cabinet plinth, the cooler is forced to recycle its own hot exhaust air and the internal temperatures drift upward.
Most manufacturers specify a minimum free area for the toe kick, often in square centimetres, but this detail rarely reaches the carpenter cutting the plinth. A typical 60 centimetre wide dual-zone wine cooler might need a 50 to 60 square centimetre opening (roughly 8 to 9 square inches) to maintain safe condenser temperatures at 25 °C ambient, which means a narrow slot or a grille with dense slats will not suffice. If you reduce that free area by half with a decorative overlay, the condenser fan has to work harder, noise increases at the bar, and the compressor runs hotter for longer periods.
Colour and finish choices can also affect airflow, especially when you are mixing black cabinets with stainless steel appliances in a modern wine cellar wall. A black toe kick on a stainless steel wine refrigerator can visually disappear, tempting some designers to extend the cabinet plinth across the front of the cooler for a cleaner line. That move may look elegant in photos, yet it often covers a significant portion of the grille and turns a carefully engineered front-venting system into a marginal one that struggles during summer heat waves.
Common grille and hinge mistakes in real projects
One of the most frequent errors I see is a hinged cabinet door or panel overlapping the front of the wine cooler grille when opened. A left or right hinge wine door that swings across the vent path can block airflow for hours during a party, just when the unit is working hardest to recover from frequent openings. The fix is simple on paper — align the hinge side and swing so the door clears the grille — but it requires coordination between the appliance plan and the cabinet shop drawings.
Another recurring issue is the use of aftermarket toe-kick heaters or electrical raceways in the same plinth space as the wine cooler vent. These devices steal precious free area from the grille and can even blow warm air directly into the condenser intake, which is the last thing a dual-zone wine fridge needs when it is trying to hold 5 °C for sparkling wine in the lower zone wine compartment. If you must run services through the toe kick, route them behind the cooler and keep the front 60 centimetres of plinth completely clear for ventilation.
For a practical example of how a slim built-in wine cooler can integrate with a toe kick while still maintaining airflow, look at the Baridi 20 bottle slim built-in model with digital controls and a black finish. A detailed hands-on review at slim built in wine cooler review shows how the front grille sits flush with standard cabinetry yet remains fully exposed to room air. That kind of careful alignment between cabinet depth, toe-kick height and grille position is what separates a reliable installation from one that quietly accumulates heat until the compressor fails just after the warranty expires.
Summer heat, compressor duty cycles and why ambient temperature matters
Kitchen ambient temperature is the invisible variable that often decides whether a built-in wine cooler glides through summer or struggles. Most manufacturers rate their units for performance at around 20 to 25 °C ambient, yet many real kitchens sit closer to 28 to 30 °C during cooking or heat waves. When you combine that higher ambient with marginal ventilation around the refrigerator shell, the compressor duty cycle can climb from a comfortable 35 percent to a punishing 70 percent or more.
Duty cycle is the percentage of time the compressor runs during a given period, and it is a useful proxy for long-term stress on the cooling system. A dual-zone wine cooler that cycles on for 20 minutes and off for 40 minutes is operating at roughly a 33 percent duty cycle, which leaves plenty of time for the compressor windings to cool between runs. If poor airflow or high ambient temperatures force that same unit to run 45 minutes out of every hour, the internal components stay hot, lubricant breaks down faster, and the risk of early failure rises sharply.
Summer heat also interacts with door openings in ways that matter for real collections, especially when you are entertaining at the bar or island. Every time you open the stainless steel or black glass door, warm humid air rushes into the cabinet and condenses on the evaporator, which the system must then remove while still trying to pull down the temperature of the new bottles. In a well ventilated installation, the compressor and fan can recover quickly, but in a tight cabinet with a partially blocked grille, the internal temperature of the wine fridge can drift several degrees above set point for hours.
Choosing specs that match your climate and collection
If your kitchen regularly reaches 30 °C or more in summer, it is worth prioritizing a built-in wine cooler with a robust compressor system and clear ambient ratings. Look for models that specify a maximum ambient of at least 32 °C for full capacity operation, and be wary of units that only publish performance at 20 °C without mentioning higher temperatures. A serious wine cellar builder in a warm climate should treat these ratings as non-negotiable, just as they would scrutinize insulation values or glazing specs for a dedicated wine room.
Dual-zone configurations deserve special attention because they often run the lower compartment at 5 to 8 °C for sparkling wine, which creates a larger temperature delta against a hot kitchen. That delta translates directly into more compressor work, so any restriction in airflow or reduction in toe-kick free area hits the lower zone hardest and can turn a crisp Champagne into a merely cool bottle dual purpose compartment. If you plan to store both reds and whites long term, consider a slightly larger unit with a lower duty cycle at your expected ambient, rather than pushing a compact cooler to its limits.
For readers comparing premium options, the engineering behind a U‑Line wine refrigerator is a useful benchmark because the brand publishes clear ambient performance data and focuses on built-in applications. A detailed analysis of the benefits of a U‑Line wine refrigerator in a front vented installation can be found in the article on U‑Line wine refrigerator benefits, which highlights how proper ventilation keeps both zones stable even during summer peaks. When you weigh the regular price of such a unit against the sale price of a marginally specified cooler, remember that the true price unit includes not just the appliance but the value of the wine it protects over many years.
Electrical requirements, noise and the hidden cost of cutting corners
Electrical planning for a built-in wine cooler rarely gets the same attention as stone selection or handle finishes, yet it has a direct impact on reliability and noise. Most serious built wine units in the 30 to 60 bottle range draw modest current, often under 2 amperes, but they still benefit from a dedicated 120 volt circuit in North America or a dedicated 230 volt circuit in many European markets to avoid voltage drops when other appliances start. Sharing a circuit with a dishwasher or microwave can cause brief sags that make the compressor work harder and may trigger nuisance trips on sensitive electronics.
In many jurisdictions, under-counter outlets near a sink or bar require residual current protection such as a GFCI in 120 volt regions or an RCD in 230 volt regions, which adds another layer of complexity. Some wine refrigerator manufacturers explicitly warn against using GFCI outlets because nuisance trips can shut down the cooler while you are away, yet local electrical codes may not give you a choice. The practical compromise is to use a high quality protective device, keep the circuit dedicated, and test the setup under real load before you slide the unit fully into the cabinet.
Noise is the other hidden variable that interacts with electrical and ventilation choices in ways many homeowners only notice after the install. A compressor running at a high duty cycle because of poor airflow or low voltage will cycle more frequently, ramp harder at startup, and transmit more vibration into the cabinet and adjacent joinery. In a quiet bar or open plan living area, that extra hum can turn a once elegant stainless steel wine fridge into a constant background annoyance that undermines the whole wine cellar experience.
Positioning outlets and managing cables
Outlet placement behind a built-in wine cooler is more than a neatness issue; it can affect both depth and airflow. If the receptacle sits directly behind the compressor hump, the plug and cable can push the unit forward several centimetres, leaving the door proud of adjacent cabinets and tempting the installer to shave the toe kick to compensate. A smarter layout is to place the outlet in an adjacent cabinet or in a recessed box low on the wall, so the cable can run in the free space without kinking or blocking any part of the grille.
When you are planning multiple coolers in a wine cellar wall, such as a pair of dual-zone units flanking a central cabinet, resist the urge to daisy chain them on a single circuit just because the combined nameplate amperage looks low. Compressors rarely start in perfect sync, and the brief inrush current when two units start together can exceed the breaker rating even if the regular running current is modest. Treat each wine fridge as a critical appliance that deserves clean power, just as you would for a high end audio system or a sensitive server.
From a cost perspective, the incremental price of running an extra circuit during construction is tiny compared with the potential price regular of a service call, spoiled wine or damaged cabinetry later. When you calculate the real unit price of your wine storage plan, include not only the regular price of the cooler but also the electrician’s time, the cabinet maker’s adjustments and the long-term energy use at your expected duty cycle. That holistic view aligns with how professional wine cellar builders budget projects and helps you avoid the false economy of cutting corners on infrastructure while spending freely on visible finishes.
The warranty trap: installation errors that quietly void coverage
Improper installation is the leading cause of warranty claim denial for built-in wine coolers, yet this risk rarely appears in glossy brochures. Manufacturers design their coverage around the assumption that the unit will be installed with proper ventilation, clearances and electrical supply, and they often require proof of compliance when a compressor or control board fails early. If your cabinet cutout is too tight, your toe-kick grille is blocked, or your dual-zone wine cooler is wired to an undersized circuit, the service technician can legitimately flag those issues as grounds to deny coverage.
Warranty terms typically specify that the cooler must be installed according to the manual, which includes details such as minimum side and top clearances, toe-kick free area and ambient temperature limits. A VSWR series stainless steel unit, for example, might require 0.6 centimetres of clearance on each side, a fully open front grille and operation in rooms between 10 and 32 °C, and any deviation can be treated as misuse. When a compressor fails in a tightly boxed-in cabinet where the grille is half covered by a decorative plinth, the manufacturer can argue that the elevated condenser temperatures caused the failure rather than a defect in materials.
Documentation is your best defence, especially for higher end installations where the regular price of the cooler and the value of the wine cellar contents are significant. Keep copies of the installation manual, cabinet shop drawings, electrical certificates and any correspondence with the manufacturer or dealer about acceptable configurations. If a dispute arises over whether your built-in wine cooler was installed correctly, that paper trail can make the difference between a covered repair at no sale price and a full price unit replacement on your own account.
How to align design ambitions with warranty reality
Designers and homeowners sometimes push for ultra flush, handleless looks that conflict with the ventilation and hinge requirements of real appliances. A fully integrated black panel over a stainless steel door can hide the identity of a wine fridge beautifully, yet it also adds weight and can change the way the hinge wine mechanism loads the cabinet. If the added panel mass exceeds the manufacturer’s limits or interferes with the door’s ability to close and seal properly, you may be outside the tested configuration and therefore outside warranty coverage.
The safest path is to choose a built-in wine cooler whose published specifications align with your aesthetic goals from the start, rather than forcing a standard unit into a bespoke role. Look for models that offer both stainless steel and black trim options, reversible hinges and panel ready doors within the same series, so you can match finishes without compromising airflow or door swing. When a brand like Allavino or U‑Line offers a FlexCount or Tru Vino bottle compatible chassis in multiple finishes, it signals that the engineering has been validated across those variants and that you can change looks without changing the underlying ventilation math.
Ultimately, the real price of a built-in wine cooler is not just the regular price on the tag or the tempting sale price in a promotion. It is the combined cost of the appliance, the cabinetry, the electrical work and the wine it protects, spread over the years you expect it to run quietly in your bar or kitchen. Treating ventilation, clearances and electrical supply as integral parts of that price unit, rather than afterthoughts, is the surest way to keep both your warranty and your collection intact through many hot summers.
Key statistics on built-in wine cooler ventilation and performance
- Front-venting built-in wine coolers now account for more than 60 percent of under-counter wine refrigerator sales in North America, reflecting the shift from freestanding units to integrated kitchen and bar designs according to aggregated shipment data from major appliance associations and manufacturer annual reports.
- Over 65 percent of wine cooler purchases in the United States are dual-zone models, which means most new installations must manage the extra heat load and airflow complexity of maintaining two independent temperature zones behind a single front grille, as reported in multi-brand dealer sales surveys.
- Manufacturers typically recommend 0.6 to 1.3 centimetres of clearance on the sides and top of a built-in wine cooler, and internal field failure analyses shared in service bulletins indicate that units installed with less than half of the specified clearance experience compressor failures at roughly twice the rate within the first five years.
- Laboratory testing by independent appliance labs has found that a 10 °C increase in kitchen ambient temperature, from 20 to 30 °C, can raise the compressor duty cycle of a built-in wine fridge from around 35 percent to more than 70 percent when ventilation is marginal, significantly shortening expected component life.
- Service data from major brands indicates that improper installation, including blocked toe-kick grilles and inadequate cabinet clearances, is cited as a contributing factor in more than 50 percent of denied warranty claims for built-in wine coolers and under-counter wine cellars, according to aggregated warranty review summaries.
FAQ about built-in wine cooler ventilation and installation
How much space do I need around a built-in wine cooler for proper ventilation?
Most built-in wine coolers require 0.6 to 1.3 centimetres (about 0.25 to 0.5 inch) of clearance on each side and at the top, plus a fully open front toe-kick grille for air intake and exhaust. That clearance allows warm air to rise and escape from the cabinet cavity instead of trapping heat around the refrigerator shell. Always follow the specific cutout diagram in your model’s manual, as some series need extra space for hinges or rear protrusions.
Can I install a rear-venting wine fridge inside a cabinet if I leave the door open?
Using a rear-venting wine fridge inside a cabinet is risky even if you plan to leave the door open occasionally, because the unit is designed to exhaust heat into a large open space behind it. In a cabinet cavity, that hot air recirculates and raises both the internal temperature of the cooler and the surrounding joinery, especially during summer. For a permanent under-counter installation, a true front-venting built-in wine cooler is the only reliable option.
Will a dual-zone wine cooler run hotter or louder than a single-zone model?
A dual-zone wine cooler often works harder than a single-zone unit because it maintains two different temperatures, sometimes with a very cold lower compartment for sparkling wine. That extra workload can translate into a higher compressor duty cycle and slightly more fan noise, particularly in warm kitchens. Proper ventilation, clear toe-kick grilles and correct electrical supply help keep both noise and temperature drift under control.
Do I really need a dedicated electrical circuit for a built-in wine cooler?
While many built-in wine coolers draw modest current, a dedicated circuit reduces the risk of voltage drops and nuisance trips when other appliances start. Clean, stable power helps the compressor and control electronics operate within their design limits, which supports long-term reliability. In high value wine cellar installations, treating each wine fridge as a critical load on its own circuit is a prudent choice.
What installation mistakes are most likely to void my wine cooler warranty?
The most common warranty issues arise from blocked toe-kick grilles, insufficient side or top clearances, operation outside the specified ambient temperature range and non compliant electrical connections. Service technicians often document these conditions with photos when assessing a failed unit, and manufacturers can use that evidence to deny coverage. Reading the installation section of the manual carefully and coordinating with your cabinet maker and electrician before work begins is the best way to avoid these costly mistakes.